
Photinia fraseri seeds
HOW TO PLANT CORRECTLY
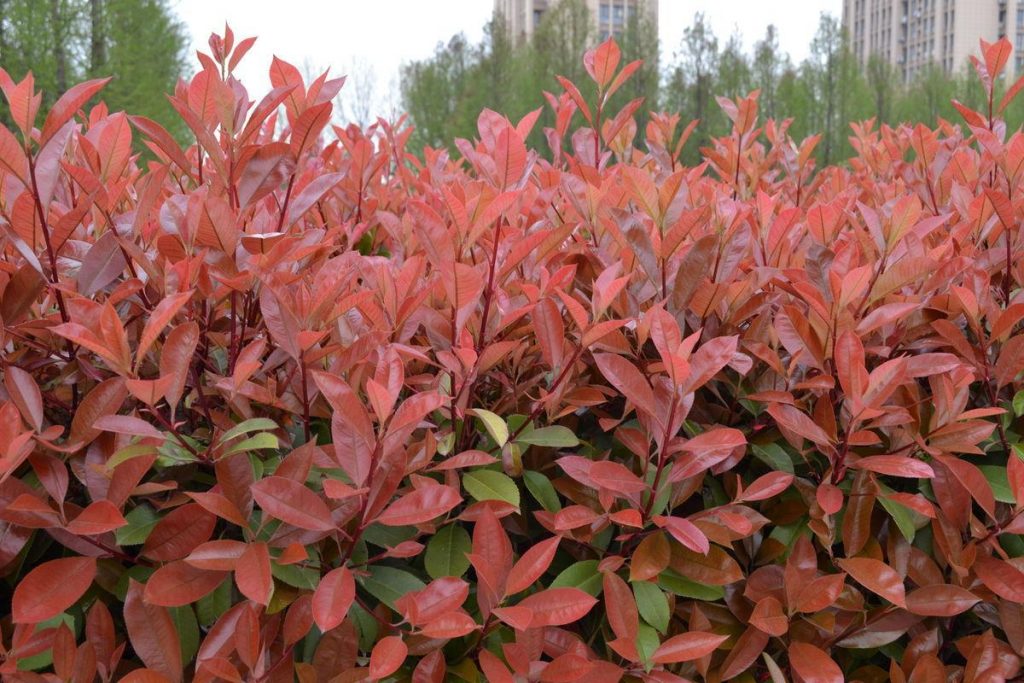
Photinia is a group of small trees and shrubs in the rose family. Most trees reach a Mature height of about 5 m. Plants include both evergreen and deciduous species, and they have glossy green lance-shaped leaves, often with scalloped edges. The foliage often has a reddish color when it appears in spring, many deciduous varieties show brilliant autumn colors. Photinia blooms in spring with dense clusters of spectacular white flowers. By autumn, the flowers are replaced by red fruit in the form of apples, which serve as a food source for many species of birds.
Care of Photinia
Photinia is a hardy plant that does not require special care, it will even survive a certain degree of neglect by the gardener.
But, as with most plants, you can achieve much better results if you follow a few very simple tips for growing and caring for this plant.
Choosing a place for the Photinia.Plant young Photinia plants at a distance of 60-100 cm from each other. Best of all, Photinia grows in full sun in a sheltered place, although it will tolerate a little light shade. Young shoots can be damaged by cold, dry winds and frosts if they are planted in an open part of the garden. If the garden is in the shade, try to ensure good air movement because the Photinia has not been attacked by fungi if there is too much moisture around.
Watering Photinia.Once the plant has taken root, it is quite resistant to drought, but newly planted specimens require regular watering for the first two years while they develop a healthy and extensive root system.
Soil conditions.Photinia grows well in most garden soils if they are well drained, but the ideal is a deep loam. Photinias are unlikely to survive in swampy or very heavy clay soil. While some Photinia species react poorly to chalky soil, others will tolerate any normal acidic, neutral, or alkaline conditions.
Fertilizers.Usually, Photinia shrubs do not require top dressing, but if they suffer from excessive and sudden leaf fall or are clearly ill, then top dressing can give an impetus to new healthy growth. Photinia grown in a container, after six to eight weeks in a new pot, will need monthly feeding with a balanced fertilizer with trace elements: special formulations are now available in garden centers for shrubs.
Transplant Photinia.
Photinia thrives in containers. It will grow quite happily in a pot with a diameter of 50 cm or more, although care should be taken to use a pot of suitable size, shape and weight to avoid overturning the Bush in the wind. You can use a standard multi-purpose substrate for planting. A generous and deep watering is necessary when the top couple of centimeters of the substrate becomes dry to the touch.
Pruning Photinia.
Plants should not be pruned in the first three years of growth after planting.
Photinia can grow up to 30 cm per year, and if it is not stopped, it will reach a height and spread of about 5 m, so it is necessary to prune quite often to maintain its shape.
Pruning encourages the growth of new foliage with a bright red color, although this will occur at the expense of flowers if pruned later than mid-June, when the flowers die. Pruning later means that the petioles on which the flowers will form next year are removed.
Fresh red foliage can be obtained by pruning at any time from spring to autumn, so a decision can be made as to whether the red foliage or flowers of the plant are more preferable. Pruning from August to autumn will lead to new growth, which may be affected by early frosts.
Pruning involves removing the stems just above the leaf or Bud facing outward. Removing 15-20 cm of the process should be sufficient to keep the Bush the same, and it will respond well to such maintenance until it reaches a minimum height of about 1.5 m. the Best of the cut stems can be used in vases and Flower arrangements.
Photinia hedges are better cut with hedge scissors, without too much concern for the position of the buds or leaves, as fresh new growth will soon mask any voids.
A shrub that is out of control can be subjected to drastic reconstruction. In may, trim all the stems to 60 cm above the ground and remove some stems to ground level to give the plant an open center. As new forms of growth appear, keep the best stems and remove others.
The propagation of Photinia.
The best method of propagation of Photinia is by young cuttings taken in early summer, or by Mature cuttings taken in autumn. Both types take root well with a high degree of success.
The length of the cuttings should be about 10 cm, taken from a stem with a diameter of about 1 cm. Cut just below the leaf node and remove the lower leaves from the stalk. Place them immediately in a plastic bag so they don’t lose water until they are ready to land. Cuttings should be planted in a 12 cm pot as soon as possible after cutting, using an equal combination of General purpose compost and garden sand. Insert them 4 cm into the compost and carefully secure them to ensure good contact between the stem and the compost.
Place the pot in a shallow tray of water for thirty minutes to make sure the compost is wetted without waterlogging the surface. Cover the pot with plastic wrap or a plastic bag attached to sticks or a wire frame so that the plastic does not touch the leaves. Place in a cool, bright place, protected from direct sunlight.
The cuttings should show signs of growth within three weeks, after which the plastic bag should be removed. They can be stored during the winter in a cold place or in a greenhouse without heating, and watered sparingly when the compost is dry. Planted in the ground next spring, when the danger of freezing has passed.
Common problems with Photinia
Too much moisture is a curse for Photinia. The plant may be susceptible to fungal attacks. Photinia is usually a healthy plant and is rarely affected by pests or diseases. The only exception is its vulnerability to leaf spotting.
Some caterpillars eat the leaves of Photinia, but the damage is rarely serious or lasting. Plants grown in containers from garden centers and supermarkets should be checked for signs of damage by carefully removing the plant from the pot and examining for damage to the roots.
With the exception of leaf spotting, Photinia usually has good disease resistance. Symptoms of leaf spotting are rounded, dark red or black spots on the leaves, sometimes more noticeable in areas that are less exposed to the sun. Affected leaves eventually fall off, and in extreme cases, the plant can die.
With more widespread damage, the plant may be subjected to hard pruning in may, and all cut material must be burned or disposed of. The plant should quickly revive with fresh growth. If the problem persists, it might be better to replace it.
A spot on the leaves is not the only possible cause of spotty leaves and leaf fall, so a thorough diagnosis is necessary. In many cases, defoliation can be caused by environmental conditions, such as prolonged humidity or exposure to cold, dry winds.
Photinias are also prone to powdery mildew damage. It spreads directly below the soil surface from shrub to shrub and affects the root systems of plants, limiting their ability to absorb water and nutrients. Affected plants look mostly unhealthy with withering and loss of leaf color, and a white fungal mycelium may appear around the base of the stems.
Try to give the plants more sunlight, but where infections are particularly resistant, you may need a sulfur-based spray.
Roots and root rot are also the result of too much water and can lead to leaf wilt and premature leaf fall, bark discoloration, and dead stems. Stop watering and let the roots dry.
If you feel that the situation requires more serious remedial measures, you can temporarily remove the soil around the stem to the upper roots to speed up the drying process. Fungicides can help as a preventative measure.
Often, the only successful treatment is to destroy the affected plants and transplant resistant species.
Note:
- the Color and size may differ from the photo depending on the color of the monitor display
- the Quantity may vary by 1-5% due to manual counting
- Seeds should be stored in a cool place before sowing
- Seeding should be done in accordance with the conditions described above.